Showing posts with label MVVM. Show all posts

Tuesday, October 14, 2014

WPF and MVVM - Events

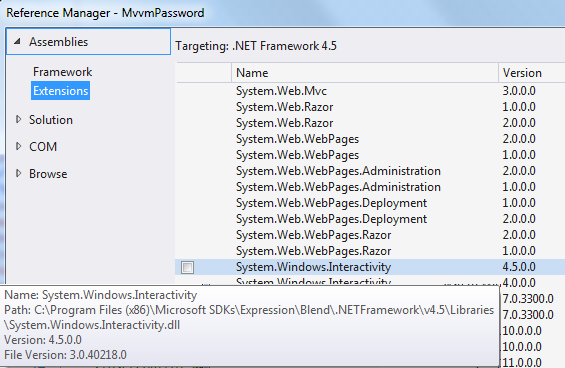
Last time we have seen how to use RelayCommand in ViewModel instead of a click event in View. But what's about all the other events? There is an easy solution where RelayCommand can be used. Therefore we need to add a Reference to the Extension Assembly System.Windows.Interactivity from Blend SDK (for VS2013).


In the XAML part of the View we need to add the namespace that leads to System.Windows.Interactivity from Blend SDK (for VS2013).
<UserControl x:Class="MvvmPassword.LoginView"
             x:Name="This"
             xmlns="http://schemas.microsoft.com/winfx/2006/xaml/presentation"
             xmlns:x="http://schemas.microsoft.com/winfx/2006/xaml"
             xmlns:i="http://schemas.microsoft.com/expression/2010/interactivity">
Now we can use i:EventTrigger with the property EventName within Interaction.Triggers to define which event should linked to Command. The Command is defined with the property Command within i:InvokeCommandAction.
        <ComboBox x:Name="UserNames"
                  Grid.Row="1"
                  Grid.Column="1"
                  Margin="4"
                  ItemsSource="{Binding UserNames}"
                  DisplayMemberPath="UserName">
            <i:Interaction.Triggers>
                <i:EventTrigger EventName="SelectionChanged">
                    <i:InvokeCommandAction Command="{Binding SelectionCommand}" />
                </i:EventTrigger>
            </i:Interaction.Triggers>
        </ComboBox>
Next we can just use the RelayCommand in ViewModel, as seen in the last post.
SelectionCommand = new RelayCommand(SelectionChanged);
public ICommand SelectionCommand
{
    get;
    private set;
}
private void SelectionChanged(object parameter)
{
    // ...
}
With the ViewModelBase class, the RelayCommand and the EventTrigger our small MVVM Framework can be taken as a good starting point.

Further Posts

  1. WPF and MVVM - Fundamentals
  2. WPF and MVVM - Commands
  3. WPF and MVVM - Events

Sunday, October 12, 2014

WPF and MVVM - Commands

To extend the MVVM idea, it is necessary to move more code from code-behind of the View to the ViewModel. In the first part we have seen how the properties from the ViewModel can be binded to the View and how changes can be notified.

Now we will see how to move click event handler from code-behind of the View to the ViewModel. Therefore the Command property in XAML of the View is used instead of the click event. The property is set to an instance of an implementation of ICommand. For that we want to have a reusable implementation. One way is to use the DelegateCommand that is also used in the Prism Class Library, the usage is described here. But we want to focus on the simpler implementation of RelayCommand. The RelayCommand builds on WPF Commanding.
public class RelayCommand : ICommand
{
    private readonly Action<object> _Execute;
    private readonly Func<objectbool> _CanExecute;
 
    public RelayCommand(Action<object> execute)
        : this(execute, null)
    {
 
    }
 
    public RelayCommand(Action<object> execute, Func<objectbool> canExecute)
    {
        if (execute == null)
        {
            throw new ArgumentNullException("execute""Execute cannot be null.");
        }
 
        _Execute = execute;
        _CanExecute = canExecute;
    }
 
    public event EventHandler CanExecuteChanged
    {
        add { CommandManager.RequerySuggested += value; }
        remove { CommandManager.RequerySuggested -= value; }
    }
 
    public void Execute(object parameter)
    {
        _Execute(parameter);
    }
 
    public bool CanExecute(object parameter)
    {
        if (_CanExecute == null)
        {
            return true;
        }
 
        return _CanExecute(parameter);
    }
}
The RelayCommand implements the interface ICommand. Therefore we have to implement the methods Execute and CanExecute. These methods call other methods that you have passed as Action and Func generic delegate to the constructor of the RelayCommand class. Furthermore we have to implement the CanExecuteChanged event. Execute can only be called if CanExecute returns true. If CanExecute depends on one or more properties, then on each change of one of these properties CanExecuteChanged have to be fired so that CanExecute is checked again. To simplify and to automate firing the event, the event is hooked to the static RequerySuggested event of the CommandManager. Doing so the CanExecuteChanged event is called after each action in the UI. In some cases you want to call the CanExecuteChanged event manually (such as CanExecute doesn't depends only on UI properties). Therefore the event hook can be removed and a method is added that can be called manually.
public event EventHandler CanExecuteChanged;
public void OnCanExecuteChanged()
{
    if (CanExecuteChanged != null)
    {
        CanExecuteChanged(thisnew EventArgs());
    }
}
Using the RelayCommand we can move click event handler to the ViewModel. Therefore we add a property whose type is of ICommand.
public ICommand LoginCommand
{
    get;
    private set;
}
The ICommand will be instantiated in the constructor.
LoginCommand = new RelayCommand(Login, CanLogin);
The Execute method of the RelayCommand will call Login.
private void Login(object parameter)
{
    var passwordContainer = parameter as IHavePassword;
    if (passwordContainer != null)
    {
        var secureString = passwordContainer.Password;
        PasswordInVM = ConvertToUnsecureString(secureString);
    }
}
While the CanExecute method of the RelayCommand will call CanLogin.
private bool CanLogin(object parameter)
{
    return !string.IsNullOrEmpty(UserName);
}
At last we need only to add the right Command by binding to the View. We can also pass through a parameter by using CommandParameter. The parameter is set to both methods, Execute and CanExecute.
<Button x:Name="Login"
        Content="Login"
        Command="{Binding LoginCommand}"
        CommandParameter="{Binding ElementName=This}" />
With the RelayCommand class we have our second component of our own MVVM-Framework.

Further Posts

  1. WPF and MVVM - Fundamentals
  2. WPF and MVVM - Commands
  3. WPF and MVVM - Events

Thursday, September 11, 2014

WPF and MVVM - Fundamentals

Model-View-ViewModel (MVVM) is a popular pattern when programming in WPF (Windows Presentation Foundation). It is used to separate the GUI, the business logic and the data. While Model and ViewModel are class files, the View consists of a XAML file and a class file (code-behind) as a User Control.
The patern consists of several components. Sometimes not all components are needed to achieve the goal (and also sometimes MVVM is not needed..). But always the ViewModel needs to be set to the DataContext of the View. This can be done in several ways (here you can found how: Setting the DataContext of a View to a ViewModel in MVVM).
By setting the DataContext of a View, you can bind components of a View to properties of a ViewModel. For example, when you enter in a View some text into a TextBox, the value is set to the binded property in the ViewModel.
<TextBox x:Name="UserName"
         Text="{Binding UserName}" />  
public string UserName
{
    get;
    set;
}
If you are using a Model (maybe a POCO), the Model is very likely a member of your ViewModel. Then your code could look something like that.
public string UserName
{
    get
    {
        return _Model.UserName;
    }
    set
    {
        _Model.UserName = value;
    }
}

You can also bind collections in a ViewModel to a View that act as source for controls like ComboBox, ListBox, DataGrid, and so on.
<ListBox ItemsSource="{Binding Users}"
         DisplayMemberPath="UserName"/> 
public ICollection<User> Users
{
    get
    {
        return _Model.Users;
    }
    set
    {
        _Model.Users = value;
    }
}
public class User
{
    public string UserName
    {
        get;
        set;
    }
 
    // ...
}
To dynamically add elements from a View to a collection in a Model, we need to encapsulate the collection by a ObservableCollection.
Users = new ObservableCollection<User>(_Model.Users);
public ObservableCollection<User> Users
{
    get;
    set;
}
When a new element is added to the ObservableCollection, we also need to add a element to the collection in the Model. Therfor we add an event handler to the CollectionChanged event of the ObservableCollection.
Users.CollectionChanged += Users_CollectionChanged;
void Users_CollectionChanged(object sender, NotifyCollectionChangedEventArgs e)
{
    if (e.Action == NotifyCollectionChangedAction.Add)
    {
        foreach (User item in e.NewItems)
        {
            _Model.Users.Add(item);
        }
    }
}
The ViewModel consequently have all properties of the Model. But not only this, it have also properties that affect the View. So maybe you want to disable a Button until a TextBox is not empty.
<Button x:Name="Login"
        Content="Login"
        IsEnabled="{Binding CanLogin}" /> 
public string UserName
{
    get
    {
        return _Model.UserName;
    }
    set
    {
        _Model.UserName = value;
        CanLogin = !string.IsNullOrEmpty(value);
    }
} 
public bool CanLogin
{
    get;
    set;
}
But this will not work until now. The View doesn't realize that the property CanLogin has changed. To let the View realize that, we need to implement the INotifyPropertyChanged interface. If we move the implementation of the interface in an own class, we can use this base class for all ViewModels. Here is an example of the implementation of the INotifyPropertyChanged:
public class ViewModelBase : INotifyPropertyChanged
{
    public event PropertyChangedEventHandler PropertyChanged;
 
    public void OnPropertyChanged(string name)
    {
        if (PropertyChanged != null)
        {
            PropertyChanged(thisnew PropertyChangedEventArgs(name));
        }
    }
}
public class LoginViewModel : ViewModelBase
Now we can call the OnPropertyChanged method to let the View know that some property has changed. The method name of the changed property is used as parameter.
public bool CanLogin
{
    get
    {
        return _canLogin;
    }
    set
    {
        _canLogin = value;
        OnPropertyChanged("CanLogin");
    }
}
With the ViewModelBase class we have our first component of our own MVVM-Framework.

Further Posts

  1. WPF and MVVM - Fundamentals
  2. WPF and MVVM - Commands
  3. WPF and MVVM - Events

Friday, August 29, 2014

Setting the DataContext of a View to a ViewModel in MVVM

Setting the DataContext of a View to a ViewModel can be done in various ways. It can be done in the constructor of the View
public LoginView()
{
 InitializeComponent();
 DataContext = new LoginViewModel();
}
or
public LoginView(LoginViewModel viewModel)
{
 InitializeComponent();
 DataContext = viewModel;
}
or directly in the XAML
<UserControl x:Class="MvvmPassword.LoginView"
      x:Name="This"
      xmlns="http://schemas.microsoft.com/winfx/2006/xaml/presentation"
      xmlns:x="http://schemas.microsoft.com/winfx/2006/xaml"
             xmlns:local="clr-namespace:MvvmPassword">
    <UserControl.Resources>
        <local:LoginViewModel x:Key="ViewModel" />
    </UserControl.Resources>
    <Grid DataContext="{Binding Source={StaticResource ViewModel}}"> 
        ... 
    </Grid>
</UserControl>
or
<UserControl x:Class="MvvmPassword.LoginView"
      x:Name="This"
      xmlns="http://schemas.microsoft.com/winfx/2006/xaml/presentation"
      xmlns:x="http://schemas.microsoft.com/winfx/2006/xaml"
      xmlns:local="clr-namespace:MvvmPassword"> 
 <UserControl.DataContext>
  <local:LoginViewModel x:Name="ViewModel" />
 </UserControl.DataContext>
 <Grid> 
           ...
        </Grid>
</UserControl>

Friday, July 25, 2014

Get Password from WPF PasswordBox with MVVM in a secure and simple way

Keeping cleartext passwords in memory is a security risk. Therefore the Password and SecurePassword property of WPF PasswordBox is not a DependencyProperty and cannot used for binding. To access the password in the ViewModel in a secure way some work have to be done.

At first we define an interface that contains just the SecureString Password as property.
public interface IHavePassword
{
    System.Security.SecureString Password { get; }
}

The View implements the IHavePassword interface. The Property Password in code-behind returns the SecurePassword of the PasswordBox.
public partial class LoginView : UserControlIHavePassword
{
    public LoginView()
    {
        InitializeComponent();
        DataContext = new LoginViewModel();
    }
 
    public System.Security.SecureString Password
    {
        get
        {
            return UserPassword.SecurePassword;
        }
    }
}

In the XAML part of the View the click event of the login button is send by using the RelayCommand pattern that builds on WPF Commanding. Therefore the Command and the CommandParameter properties are set. The View is set to the CommandParameter.
<UserControl x:Class="MvvmPassword.LoginView"
             x:Name="This"
             xmlns="http://schemas.microsoft.com/winfx/2006/xaml/presentation"
             xmlns:x="http://schemas.microsoft.com/winfx/2006/xaml">
    <Grid>
        ...
        <PasswordBox x:Name="UserPassword"
                     Grid.Row="2"
                     Grid.Column="1"
                     Margin="4" />
        
        <Button x:Name="Login"
                Grid.Row="3"
                Grid.ColumnSpan="2"
                Margin="4"
                Content="Login"
                Command="{Binding LoginCommand}"
                CommandParameter="{Binding ElementName=This}"/>
        ...
    </Grid>
</UserControl>
In the ViewModel the LoginCommand is linked to the Login method. This method gets the View as parameter. The view is casted to defined interface IHavePassword. From that we can easily obtain the secure password.
private void Login(object parameter)
{
    var passwordContainer = parameter as IHavePassword;
    if (passwordContainer != null)
    {
        var secureString = passwordContainer.Password;
        PasswordInVM = ConvertToUnsecureString(secureString);
    }
}
The SecureString needs to be converted to string to validate the entered password. There are some pitfalls of converting a SecureString. A nice explanation of them can be found in How to properly convert SecureString to String by Fabio Pintos.
private string ConvertToUnsecureString(SecureString securePassword)
{
   if (securePassword == null)
   {
     return string.Empty;
   }
 
   IntPtr unmanagedString = IntPtr.Zero;
   try
   {
     unmanagedString = Marshal.SecureStringToGlobalAllocUnicode(securePassword);
     return Marshal.PtrToStringUni(unmanagedString);
   }
   finally
   {
     Marshal.ZeroFreeGlobalAllocUnicode(unmanagedString);
   }
}

The source code can be downloaded from https://code.msdn.microsoft.com/Get-Password-from-df012a86?redir=0

Wednesday, April 30, 2014

Sorting Evolution (8) - Sorting a WPF ListView/GridView by clicking on the header - Behaviors (Expression Blend)

Eighth generation

Last time (Seventh Generation) we used Attached Properties to enable sorting within XAML. An alternative, but similar approach is Behaviors (Blend for VS2013, Working with Behaviors) from Expression Blend.

To create a custom Behavior (VS2013) the Behavior class is extended. Therefore we need to add a Reference to the Extension Assembly System.Windows.Interactivity from Blend SDK (for VS2013). To extend the Behavior<T> "using System.Windows.Interactivity" is added.

SortingAttached (Seventh Generation) is replaced by SortingBehavior. This leads to a reduction of code:

public class SortingBehavior : Behavior<ListView>
{
    private Sorting _sorting;
 
    public SortingBehavior()
    {
        _sorting = new Sorting();
    }
 
    protected override void OnAttached()
    {
        AssociatedObject.AddHandler(GridViewColumnHeader.ClickEvent,
                        new RoutedEventHandler(OnColumnHeaderClicked));
    }
 
    protected override void OnDetaching()
    {
        AssociatedObject.RemoveHandler(GridViewColumnHeader.ClickEvent,
                        new RoutedEventHandler(OnColumnHeaderClicked));
    }
 
    private void OnColumnHeaderClicked(object sender, RoutedEventArgs e)
    {
        ListView listView = sender as ListView;
        if (listView == null)
        {
            return;
        }
 
        _sorting.Sort(e.OriginalSource, listView.Items);
    }
}

There is no need to introduce a DependencyProperty. Instead we have the overridden methods OnAttached and OnDetaching. These methods add or remove the event handler (OnColumnHeaderClicked) that is executed if the column header is clicked. The method OnColumnHeaderClicked is nearly the same as in the Seventh Generation, but we do not need explicitly create and remember a Sorting object, because each ListView gets its own SortingBehavior object, where in the last sample (Seventh Generation) all ListViews have used the identical SortingAttached object.

In the XAML part of the View we need to add the namespace that leads to System.Windows.Interactivity from Blend SDK (for VS2013).

xmlns:i="http://schemas.microsoft.com/expression/2010/interactivity"

Furthermore we remove the Attached Property and set the Behavior.

<ListView x:Name="EighthResultData"
          ItemsSource="{Binding EighthResultData}">
    <i:Interaction.Behaviors>
        <sort:SortingBehavior />
    </i:Interaction.Behaviors>
    <ListView.View>
        <GridView>
            <GridViewColumn DisplayMemberBinding="{Binding ResultNumber}">
                <GridViewColumnHeader Content="Number"
                                      Padding="2,0,20,0"
                                      HorizontalContentAlignment="Left" />
            </GridViewColumn>
            <GridViewColumn DisplayMemberBinding="{Binding ResultOutput}">
                <GridViewColumnHeader Content="Output"
                                      Padding="2,0,20,0"
                                      HorizontalContentAlignment="Left" />
            </GridViewColumn>
        </GridView>
    </ListView.View>
</ListView>

The source code can be downloaded from https://code.msdn.microsoft.com/Sorting-a-WPF-ListView-by-7e9c5e4a

Further Posts

  1. Sorting a WPF ListView/GridView by clicking on the header
  2. Sort Direction Indicators 
  3. Sort in ViewModel 
  4. Sort Direction Indicators with Adorners
  5. Reusability
  6. More Reusability
  7. Attached Property
  8. Behaviors (Expression Blend)

Tuesday, March 25, 2014

Sorting Evolution (7) - Sorting a WPF ListView/GridView by clicking on the header - Attached Property


Seventh generation

With the last post (Sixth Generation) we have improved our sorting mechanism that it can be easily reused in diverse projects. From that point no further changes are necessary. Nevertheless in this post we will use the developed sorting mechanism combined with Attached Property. This will remove the possibility to use the sorting mechanism within the ViewModel although sorting can be placed within XAML, only. Therefore we have to do some changes.

The Sorting class is refactored so that there is only one public method (Sort), the method SetAdorner is called from that. Determination of SortDirection is done only once in SetAdorner and is removed from Sort. The property SetData<T> and method GetView are removed. Sorting is initialized now from Attached Property (View side) not by ViewModel.

public void Sort(object columnHeader, CollectionView list)
{
    string column = SetAdorner(columnHeader);
 
    list.SortDescriptions.Clear();
    list.SortDescriptions.Add(
        new SortDescription(column, _sortDirection));
}

To create a custom Attached Property a static DependencyProperty is defined (IsSortingProperty) by using the RegisterAttached method. This method has the possibility to set a PropertyMetadata as parameter in that a PropertyChangedCallback can be defined (OnSortingPropertyChanged) by using Delegates. In the callback method an event handler is added to/removed from ListView that is called on clicking on a column header. The event handler ensures that the column is sorted. In order that the Attached Property can be used with several ListView a Dictionary is used to store a Sorting object to each ListView object. Furthermore a static Get Accessor (GetIsSorting) and a static Set Accessor (SetIsSorting) is added.

private static IDictionary<ListViewSorting> _sorting;
static SortingAttached()
{
    _sorting = new Dictionary<ListViewSorting>();
}
 
public static readonly DependencyProperty IsSortingProperty =
    DependencyProperty.RegisterAttached(
    "IsSorting",
    typeof(Boolean),
    typeof(SortingAttached),
    new PropertyMetadata(false, OnSortingPropertyChanged));
 
public static bool GetIsSorting(ListView element)
{
    return (bool)element.GetValue(IsSortingProperty);
}
 
public static void SetIsSorting(ListView element, Boolean value)
{
    element.SetValue(IsSortingProperty, value);
}
 
private static void OnSortingPropertyChanged(DependencyObject d,
    DependencyPropertyChangedEventArgs e)
{
    ListView listView = d as ListView;
 
    if (listView != null)
    {
        if (e.NewValue is bool)
        {
            if ((bool)e.NewValue)
            {
                listView.AddHandler(GridViewColumnHeader.ClickEvent,
                    new RoutedEventHandler(OnColumnHeaderClicked));
                _sorting.Add(listView, new Sorting());
            }
            else
            {
                listView.RemoveHandler(GridViewColumnHeader.ClickEvent,
                    new RoutedEventHandler(OnColumnHeaderClicked));
                _sorting.Remove(listView);
            }
        }
    }
}
 
private static void OnColumnHeaderClicked(object sender, RoutedEventArgs e)
{
    ListView listView = sender as ListView;
    if (listView == null)
    {
        return;
    }
    var sorter = _sorting[listView];
    sorter.Sort(e.OriginalSource, listView.Items);
}

In the ViewModel Sorting is removed, so it contains only data as in the Second Generation.

public ObservableCollection<ResultData> SeventhResultData { getset; }

In the XAML part of the View the Click event is removed and the Attached Property is added.

<ListView x:Name="SeventhResultData"
          sort:SortingAttached.IsSorting="True"
   ItemsSource="{Binding SeventhResultData}">
    <ListView.View>
        <GridView>
     <GridViewColumn DisplayMemberBinding="{Binding ResultNumber}">
         <GridViewColumnHeader Content="Number"
                        Padding="2,0,20,0"
          HorizontalContentAlignment="Left" />
     </GridViewColumn>
     <GridViewColumn DisplayMemberBinding="{Binding ResultOutput}">
                <GridViewColumnHeader Content="Output"
                               Padding="2,0,20,0"
                        HorizontalContentAlignment="Left" />
            </GridViewColumn>
        </GridView>
    </ListView.View>
</ListView>

In the code-behind of the View nearly all code is removed, only DataContext is there set.

With all that changes Sorting can now be done by only adding Attached Property, but cannot be triggered from ViewModel.

The source code can be downloaded from http://code.msdn.microsoft.com/windowsdesktop/Sorting-a-WPF-ListView-by-027e2303

Further Posts

  1. Sorting a WPF ListView/GridView by clicking on the header
  2. Sort Direction Indicators 
  3. Sort in ViewModel 
  4. Sort Direction Indicators with Adorners
  5. Reusability
  6. More Reusability
  7. Attached Property
  8. Behaviors (Expression Blend)

Wednesday, March 12, 2014

Sorting Evolution (6) - Sorting a WPF ListView/GridView by clicking on the header - More Reusability

Sixth Generation

Now we want to extract the sorting method to an own class. So it can also reused every time we need sorting.

private ListSortDirection _sortDirection;
private string _sortColumnName;
private CollectionViewSource _dataView;

public void SetData<T>(IEnumerable<T> data)
{
  _dataView = new CollectionViewSource();
  _dataView.Source = data;
}

public ListCollectionView GetView()
{
  return (ListCollectionView)_dataView.View;
}

public void Sort(string column)
{
  if (_sortColumnName == column)
  {
    // Toggle sorting direction
    _sortDirection = _sortDirection == ListSortDirection.Ascending ?
                                       ListSortDirection.Descending :
                                       ListSortDirection.Ascending;
  }
  else
  {
    _sortColumnName = column;
    _sortDirection = ListSortDirection.Ascending;
  }

  _dataView.SortDescriptions.Clear();
  _dataView.SortDescriptions.Add(
                new SortDescription(_sortColumnName, _sortDirection));
}

The method SetData<T> expects an IEnumerable<T> that is used as source for a new created CollectionViewSource. The method GetView returns a ListCollectionView, the View of the CollectionViewSource. This can be used for binding in XAML. The method Sort takes a string as parameter that is the name of the property to be used for sorting. If this method is called, the CollectionViewSource will be sorted.

The code of the ViewModel can be reduced by using the new Sorting object.

private Sorting _sorter;
 
public SortingViewModel()
{
  _sorter = new Sorting();
}

private ObservableCollection<ResultData> _sixthResultData;

public ObservableCollection<ResultData> SixthResultData
{
  get
  {
    return _sixthResultData;
  }
  set
  {
    _sixthResultData = value;
    _sorter.SetData(_sixthResultData);
  }
}

public ListCollectionView SixthResultDataView
{
  get
  {
    return _sorter.GetView();
  }
}

public void Sort(string column)
{
  _sorter.Sort(column);
}

The Sorting object is instantiated in the constructor. Setting the data of the ViewModel also set the data of the Sorting object by calling SetData. An own property is used for binding the ListCollectionView retrieved by GetView. The Sort method calls the Sort method of the Sorting object.

The source code can be downloaded from http://code.msdn.microsoft.com/Sorting-a-WPF-ListView-by-a009edcb

Further Posts

  1. Sorting a WPF ListView/GridView by clicking on the header
  2. Sort Direction Indicators 
  3. Sort in ViewModel 
  4. Sort Direction Indicators with Adorners
  5. Reusability
  6. More Reusability
  7. Attached Property
  8. Behaviors (Expression Blend)

Thursday, February 13, 2014

Sorting Evolution (5) - Sorting a WPF ListView/GridView by clicking on the header - Reusability

Fifth Generation

To reduce and to reuse the code in code-behind of the View we can extract it. The extracted code is moved in an own class that can be reused every time we want to add sorting indicators to a GridViewColumnHeader of a ListView.

private ListSortDirection _sortDirection;
private GridViewColumnHeader _sortColumn;

public string SetAdorner(object columnHeader)
{
  GridViewColumnHeader column = columnHeader as GridViewColumnHeader;
  if (column == null)
  {
    return null;
  }

  // Remove arrow from previously sorted header
  if (_sortColumn != null)
  {
    var adornerLayer = AdornerLayer.GetAdornerLayer(_sortColumn);
    try { adornerLayer.Remove((adornerLayer.GetAdorners(_sortColumn))[0]); }
    catch { }
  }

  if (_sortColumn == column)
  {
    // Toggle sorting direction
    _sortDirection = _sortDirection == ListSortDirection.Ascending ?
                                       ListSortDirection.Descending :
                                       ListSortDirection.Ascending;
  }
  else
  {
    _sortColumn = column;
    _sortDirection = ListSortDirection.Ascending;
  }

  var sortingAdorner = new SortingAdorner(column, _sortDirection);
  AdornerLayer.GetAdornerLayer(column).Add(sortingAdorner);
          
  string header = string.Empty;

  // if binding is used and property name doesn't match header content
  Binding b = _sortColumn.Column.DisplayMemberBinding as Binding;
  if (b != null)
  {
    header = b.Path.Path;
  }

  return header;
}


The new class can be initiated in the constructor of the View.

private Sorting _sorter;

public SortingView()
{
  InitializeComponent();
  DataContext = new SortingViewModel();
  _sorter = new Sorting();
}

private void FifthResultDataViewClick(object sender, RoutedEventArgs e)
{
  string header = _sorter.SetAdorner(e.OriginalSource);
  var viewModel = DataContext as SortingViewModel;
  viewModel.Sort(header);
}

The method SetAdorner is called in the GridViewCoumnHeader.Click event. In this method the Adorner is set. The method returns the property name that is binded to the column that should be sorted. The name is passed to the ViewModel that is sorting the column.

The source code can be downloaded from http://code.msdn.microsoft.com/Sorting-a-WPF-ListView-by-922d983d

Further Posts

  1. Sorting a WPF ListView/GridView by clicking on the header
  2. Sort Direction Indicators 
  3. Sort in ViewModel 
  4. Sort Direction Indicators with Adorners
  5. Reusability
  6. More Reusability
  7. Attached Property
  8. Behaviors (Expression Blend)

Tuesday, February 4, 2014

Sorting Evolution (4) - Sorting a WPF ListView/GridView by clicking on the header - Sort Direction Indicators with Adorners

Fourth Generation

To enhance the sorting of WPF ListView I wanted to extract the resource that is drawing the small glyphs indicating sorting direction. Therefore I could use a ResourceDictionary and moving into it the DataTemplates defined in the Second Generation. But I decided to use an Adorner to achieve the goal. Adorners can be used to overlay a visual element over other elements.

public class SortingAdorner : Adorner
{
  private static Geometry _arrowUp = Geometry.Parse("M 5,5 15,5 10,0 5,5");
  private static Geometry _arrowDown = Geometry.Parse("M 5,0 10,5 15,0 5,0");
  private Geometry _sortDirection;
 
  public SortingAdorner(GridViewColumnHeader adornedElement, 
                   ListSortDirection sortDirection) : base(adornedElement)
  {
    _sortDirection = sortDirection == ListSortDirection.Ascending ?
                                                         _arrowUp :
                                                         _arrowDown;
  }
 
  protected override void OnRender(System.Windows.Media.DrawingContext     
                                                                  drawingContext)
  {
    double x = AdornedElement.RenderSize.Width - 20;
    double y = (AdornedElement.RenderSize.Height - 5) / 2;
 
    if (x >= 20)
    {
      // Right order of the statements is important
      drawingContext.PushTransform(new TranslateTransform(x, y));
      drawingContext.DrawGeometry(Brushes.Black, null, _sortDirection);
      drawingContext.Pop();
    }
  }
}

The SortingAdorner implements the abstract class Adorner. The constructor calls the base constructor of the Adorner class and passes the adorned element (GridViewColumnHeader) to it. Furthermore the sorting direction is set in the constructor. The small arrows are set in the overridden OnRender method. Also the position and further attributes are calculated in this method. The arrows will only set if there is enough space for it.

The ViewModel is the same as in the Third Generation.

The Resources in the XAML part of the View were removed and the layout of column headers were slightly changed so that changing the size of the header has no negative impact.

<ListView ItemsSource="{Binding FourthResultDataView}"
          GridViewColumnHeader.Click="FourthResultDataViewClick">
  <ListView.View>
    <GridView>
      <GridViewColumn DisplayMemberBinding="{Binding ResultNumber}">
        <GridViewColumnHeader Content="Number"
                              Padding="2,0,20,0"
                              HorizontalContentAlignment="Left" />
      </GridViewColumn>
      <GridViewColumn DisplayMemberBinding="{Binding ResultOutput}">
        <GridViewColumnHeader Content="Output"
                              Padding="2,0,20,0"
                              HorizontalContentAlignment="Left" />
      </GridViewColumn>
    </GridView>
  </ListView.View>
</ListView>

With that code the small glyphs occupy space on the right of the header name

If the width of the column is reduced the arrow covers the name

If the width is further reduced the arrow will disappear

Another solution could be to change to Adorner to view small glyphs in Windows Explorer style


The code-behind of the View is nearly the same as in the Third Generation, but the setting of the HeaderTemplate is replaced by adding an Adorner to the Adorner layer.

private ListSortDirection _sortDirection;
private GridViewColumnHeader _sortColumn;
 
private void FourthResultDataViewClick(object sender, RoutedEventArgs e)
{
  GridViewColumnHeader column = e.OriginalSource as GridViewColumnHeader;
  if (column == null)
  {
    return;
  }
 
  // Remove arrow from previously sorted header
  if (_sortColumn != null)
  {
    var adornerLayer = AdornerLayer.GetAdornerLayer(_sortColumn);
    try { adornerLayer.Remove((adornerLayer.GetAdorners(_sortColumn))[0]); }
    catch { }
  }
 
  if (_sortColumn == column)
  {
    // Toggle sorting direction
    _sortDirection = _sortDirection == ListSortDirection.Ascending ?
                                       ListSortDirection.Descending :
                                       ListSortDirection.Ascending;
  }
  else
  {
    _sortColumn = column;
    _sortDirection = ListSortDirection.Ascending;
  }
 
  var sortingAdorner = new SortingAdorner(column, _sortDirection);
  AdornerLayer.GetAdornerLayer(column).Add(sortingAdorner);
  string header = string.Empty;
 
  // if binding is used and property name doesn't match header content
  Binding b = _sortColumn.Column.DisplayMemberBinding as Binding;
  if (b != null)
  {
    header = b.Path.Path;
  }
 
  var viewModel = DataContext as SortingViewModel;
  viewModel.Sort(header);
}

The source code can be downloaded from http://code.msdn.microsoft.com/Sorting-a-WPF-ListView-by-cc714059

Further Posts

  1. Sorting a WPF ListView/GridView by clicking on the header
  2. Sort Direction Indicators 
  3. Sort in ViewModel 
  4. Sort Direction Indicators with Adorners
  5. Reusability
  6. More Reusability
  7. Attached Property
  8. Behaviors (Expression Blend)